Monthly Archives: February 2017

Heavenly Hosta

Hostas are amazing plants, truly glorious with heavenly foliage that is stunning as a specimen or in mass plantings. The thin spikes of purple or white, trumpet shaped flowers appear for several weeks in the summer and are an added benefit to this divine perennial. But how much do you know about hostas, and which can you add to your landscape?

Phenomenal Foliage

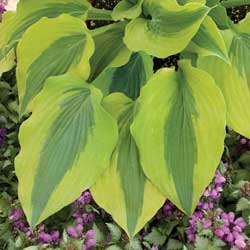
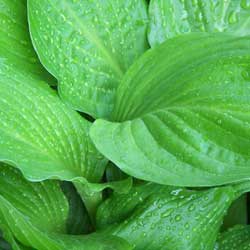
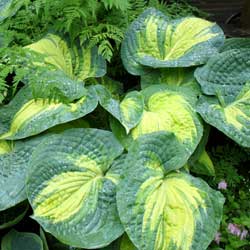
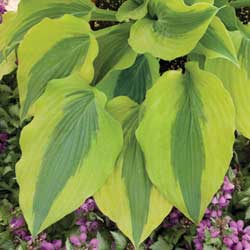
Hostas are praised by many for their magnificent variety of leaf sizes, colors and textures. These angels will grace your garden with heart-shaped, lance-shaped, oval or nearly round leaves, and leaf sizes vary as well. Smooth, quilted or puckered textures, with either a matte or glossy sheen, add to the glory and hostas’ radiant glow.

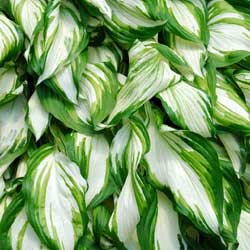
The leaf margins can be either smooth or wavy and range in color from light to dark green. Foliage colors also include chartreuse, gray and blue, depending on the cultivar. Variegated hostas with cream, white or yellow margins will radiate in a dark area of your garden.

Where to Plant Hostas

While most hostas are shade worshippers, some types will tolerate sun, depending on the overall climate and moisture levels. Hostas remain attractive from spring until frost and can withstand a wide range of growing conditions.

As choice groundcovers or single specimens in the landscape, hostas are certainly divine. Some hostas are quite unusual and rare and may increase in value each year, especially as the plants thrive and can be divided and transplanted with ease.

Best Hosta Care

Little maintenance is required to care for hostas. Cut off old flower stalks after flowers have faded. Divide plants occasionally to increase their quantity. Keep an eye out for pests, especially slugs and snails that munch on the foliage.

Types of Hostas

With so many selections and varieties, you can find a hosta the will fit into almost any garden situation. The most popular options include…

  • Dwarf & Small Hostas: In addition to being planted in secret little pockets throughout your garden or next to paths, dwarf and small hostas can be used in difficult places. Plant them among tree roots, on a slope or terrace or in rocky places containing little soil.
  • Edger Hostas: These hostas are 12” or less in height and have more horizontal growth. They are able to control weeds as they leave no light, when well established, or room for weeds to grow.
  • Groundcover Hostas: This group of hostas grows to 18” or less in height. They do a great job in areas difficult to weed or maintain. If you are in need of a hosta for use as a groundcover, keep in mind it works great to plant spring-flowering bulbs among them. The hosta comes up after the show of flowers and covers the fading foliage of the bulbs.
  • Background Hostas: Selections from this group grow to 24” or taller at maturity. They can be used to increase privacy where you sit and relax or to provide definition to your property line as a unique hedge.
  • Specimen Hostas: Specimens may be any size. Choose a site close to where the plant will be viewed so that every detail (texture, color pattern, buds, flowers and fragrance) may be enjoyed.

Not sure which hosta is right for you? Come in today and let our landscape and garden experts help you choose the right heavenly hosta to add a bit of the divine to your yard!

hosta_1

hosta_2

hosta_3

hosta_4

Dwarf Evergreen Conifers

Dwarf conifers are some of the most versatile and popular plants of today’s modern garden and landscape. These fantastic plants add interesting texture, color and form to rock, pond and container gardens as well as any type of mixed border. They come in a variety of cultivars of different sizes and growth habits, and more cultivars are being introduced all the time. Dwarf conifers are virtually carefree and often provide four seasons of interest.

Dwarf Conifer Types

We commonly think of conifers as needled evergreens such as pines, spruce and firs, but not all conifers are needled and not all are evergreen. The common larch is needled, but deciduous. Ginko trees are conifers that have fan-shaped deciduous leaves, and this tree is neither needled nor evergreen. What identifies a plant as a conifer is that it is cone-bearing.

Dwarf conifers are slower growing and smaller versions of the straight species of a given conifer. A good example is the Eastern White Pine, Pinus strobus, which can reach a height of 100 feet at maturity. The dwarf version of this plant, Pinus strobus ‘Nana’, will only grow to eighteen feet at maturity, but other than its size, it shares all the charming characteristics that are so well loved about the full-size tree.

Thanks to their popularity, new varieties of dwarf conifers are being introduced each season. This gives you an almost endless selection to consider for your landscaping needs. Some of the most popular options include…

  • Abies alba ‘Green Spiral’ (Silver Fir)
  • Abies lagrocarpa ‘Arizona Glauca Compacta’ (Rocky Mountain Fir)
  • Abies procera ‘Sherwoodi’ (Noble Fir)
  • Abies balsomea ‘Nana’ (Dwarf Balsam Fir)
  • Cedrus deodora ‘Albospica’ (Deodar Cedar)
  • Chamaecyparis obtusa ‘Nana’ (Dwarf Hinoki Falsecypress)
  • Chamaecyparis obtuse ‘Nana Lutea’ (Hinoki Falsecypress)
  • Chamaecyparis pisifera ‘Aurea Nana’ (Japanese Falsecypress)
  • Picea abies ‘Little Gem’ (Norway Spruce)
  • Picea abies ‘Conica’ (Norway Spruce)
  • Picea abies ‘Pumila’ (Norway Spruce)
  • Picea abies ‘Argenteospicata’ (Norway Spruce)
  • Picea pungens ‘Montgomery’ (Colorado Spruce)
  • Picea pungens ‘Fat Albert’ (Colorado Spruce)
  • Pinus cembra ‘Glauca Nana’ (Swiss Stone Pine)
  • Pinus mugo (Mugo Pine)
  • Pinus nigra ‘Hornibrookiana’ (Autstrian Pine)
  • Pinus sylvestris ‘Globosa Viridis’ (Scotch Pine)
  • Tsuga canadensis ‘Gentsch White’ (Canadian Hemlock)

Not sure which of these or other amazing dwarf evergreen conifers are best suited for your landscape? Let our experts help you choose a beautiful tree that will be a standout however you may use it in your yard.

dwarf_2dwarf_3

dwarf_1

New Shrub Raspberries

Rejoice! You no longer need hedgerows, trellises or complicated stakes to grow succulent raspberries. You won’t need armor-like gloves either. Now you may grow thornless raspberries in your garden or in containers on your patio, deck or front porch.

Introducing Raspberry Shortcake™

Developed in Oregon after decades of intense breeding for the most desirable plant characteristics, Raspberry Shortcake™ (Rubus idaeus ‘NR7’) is the first truly dwarf raspberry. Growing just 2 ½ to 3 feet tall with a compact, mounding shape, it is covered with full-sized sweet raspberries from mid-summer through fall. Deciduous in the winter, it produces new canes in the spring to bear even more fruit. It is self-fertile so does not require multiple plants to bear fruit, but its size, appearance and juicy berries are too good to plant just one.

Planting Your Raspberry Shrub

Well-drained, rich soil produces the best and most abundant fruit from these shrubs, and neutral pH (7.0) is preferred. If planting in a container, be sure to use a potting mix especially for containers to ensure adequate nutrition to the plant. If planting in the landscape, choose a location in full sun with moderate room suitable for some spreading, such as bordering a hedge or along a walkway that will help guide the growth and expansion. Water regularly for plump, juicy berries. A well-balanced fertilizer in early spring and summer increases plant vigor and production.

Pruning is simple, just remove the oldest canes after fruiting and enjoy the fruits on the new ones in spring. Avoid trimming away new growth, or you may miss out on future harvests, but any dead canes can easily be pruned away to keep the plant healthy and productive, as older canes will not produce new fruit.

Protecting Your Berries

It is important to note that these berries can be just as irresistible to birds and other backyard wildlife as they are to gardeners of all ages and abilities. To protect the berries so there are some left for you to enjoy, it may be necessary to use netting or other types of covers over the shrubs after the berries first appear in the summer. After the fruiting is finished, the covers can be removed.

Raspberry Shortcake™ is so simple, safe and easy, it doesn’t matter what color your gardening thumb may be, what experience you have harvesting berries or even if you’ve never grown anything to eat before – even young children can grow and harvest these mouth-watering raspberries with ease!

Let Me Out! Moving Houseplants Outside for the Season

Are your house plants looking a little peaked after a long winter of being cooped-up inside? Getting out for some fresh air during the warm months is healthy for all living things, including your potted plants. It is important to move plants safely and thoughtfully, however, or else you risk shock and damage that can destroy your carefully cultivated houseplants. With the right steps, you can move your houseplants to outdoor accommodations for the spring and summer while still protecting them from unfavorable conditions, pests and wildlife.

Tips for Moving Houseplants Outdoors

When you are ready to move your houseplants outside…

  • Wait until there is no longer any danger of freezing or frost before setting houseplants outside.
  • Before you place plants outdoors, acclimate them to the spring temperatures. Set them outside for short periods of time and bring them inside at night.
  • Over a period of two weeks, lengthen the plants’ outdoor exposure time gradually. Continue to bring plants inside at night if temperatures are not consistently above 55 degrees Fahrenheit.
  • Do not place plants directly in the sun or else the leaves may burn.
  • Set plants on pot feet or a suitable plant stand to prevent sow bugs.
  • Arrange plants in groups for increased humidity, being careful to promote good air circulation within the foliage.
  • Check soil often for moisture levels, as warmer days and breezes may dry pots out more quickly.
  • Empty saucers of excess water to prevent root rot and minimize standing water that will attract biting insects.
  • While away on vacation, use a self-regulating plant watering system.
  • Mulch the surface of the soil to retain moisture and keep weed seeds from invading the soil.
  • Keep squirrels from digging in pots by placing a layer of crushed oyster shells or chicken wire on top of the soil.
  • Use a slow-release fertilizer to save you time and energy on frequent fertilizing. Or, use a water soluble fertilizer every other week. Follow the manufacturer’s instructions so as not to burn tender plant roots.
  • Groom plants by clipping off damaged stems, yellow leaves and spent flowers. This will also improve air circulation and sunlight reach.
  • Trellis or stake plants that get too tall to prevent them from flopping over.

As they enjoy their time outdoors, you’ll see healthier, more robust houseplants with plentiful new growth and vigor. Why not give all your plants a great spring and summer getaway by moving them outdoors?

move_1

Shade Gardening: A Natural Opportunity

Although developing a garden for a shady area may require a little extra planning, some more thought and a bit more effort than sunny spaces, there are many opportunities to grow remarkable, unusual plants in the shade garden. Shade-loving plants are often noted for their foliage and can be combined to produce appealing contrasts in form, texture and color. From the glossy, dark greens of camellias and rhododendrons to the soft, silvery lamiums and the bold-textured, brownish-purple leaves of bergenia, the diversity of foliage available is positively breathtaking!

Defining Shade

The term “shade” encompasses many light conditions. Shade can range from dense darkness to the light-dappled shade under a birch tree. Most plants require at least a few hours of direct light each day (light shade) to look their best, especially if they feature bright colors in foliage or blooms. Some plants, however, do best in an abundance of filtered light (medium shade), especially if the shade is provided in the afternoon to cut the strongest rays of the sun. In the meantime, a few plants can thrive in the darkness of a forest (dense shade), without ever being exposed to bright, direct sunlight.

Other factors you will need to consider when planting your shade garden are the amount of moisture your shady spot receives and the soil conditions. The soil under large trees is usually dry because of the “umbrella” affect created. Other locations may have soggy soil that will only allow bog-type plants to grow. The soil’s drainage, pH and texture will all have to be taken into account to create the best shade-loving garden.

Not sure where to start for finding plants for a shade garden? Top shade-loving perennials and their requirements include…

Perennials for Dry Shade:

  • Convallaria majalis (Lily of the Valley)**
  • Dicentra ‘Luxuriant’ (Bleeding Heart)*
  • Epimedium perralchicum, pinnatum, pubigerum (Bishop’s Hat)*
  • Geranium maculatum, endressii, nodosum (Cranesbill)*
  • Helleborus foetidus*
  • Lamium maculaturm (Deadnettle)*
  • Polygonatum multiflorum (Soloman’s Seal)*

Perennials for Cool, Moist Soils in Shade:

  • Adiantum pedatum (Maidenhair Fern)**
  • Athyrium nipponicum ‘Pictum’ (Japanese Painted Fern)**
  • Cyrtomium (Japanese Holly Fern)**
  • Dryopteris erythrosora (Autumn Fern)**
  • Dryopteris marginalis (Marginal Shield Fern)**
  • Epimedium grandiflorum, warleyense*
  • Helleborus viridus, orientalis (Lenten Rose)*
  • Mertensia virginica (Virginia Bluebell)**
  • Polystichum acrostichoides (Christmas Fern)**
  • Polystichum setiferum ‘Divisilobum’ (Soft-Shield Fern)**
  • Tiarella cordifolia (Foam Flower)*
  • Tricyrtis formosana (Toad Lily)*
  • Trillium sessile, grandiflorum**
  • Trollius europaeus*

Perennial Groundcovers in Shade:

  • Acanthus mollis (Bear’s Breech)*
  • Aegopodium podagraria ‘Variegatum’ (Goutweed)*
  • Asarum europaeum (European Wild Ginger)*
  • Galium odoratum (Sweet Woodruff)*
  • Lamiastrum galeobdolon ‘Florentinum’ (Variegated Archangel)*
  • Lamium maculatum ‘Beacon Silver’ (Dead Nettle)*
  • Luzula sylvatica ‘Marginata’*
  • Tiarella cordifolia (Foam Flower)*
  • Vinca minor*
  • Waldsteinia ternata (Barren Strawberry)*

Climbers for Shady Walls & Fences:

  • Akebia quinata, trifoliata
  • Clematis ‘Nelly Moser’
  • Euonymus fortunei ‘Coloradus’
  • Hedera helix (English Ivy)
  • Humulus lupulus (Golden Hops)
  • Lonicera japonica ‘Halliana’ (Japanese Honeysuckle)
  • Parthenosis henryana, quinquefolia, tricuspidata

*Does best in light shade
**Does best in medium to dense shade

shadeperennials1shadeperennials3

shadeperennials2

Try Delosperma

“Ice plants” refer to several types of plants, usually succulents with fleshy thick leaves in cool green-blue colors. However, after an introduction to Delosperma, you’ll know it as the real deal. As a group of tough groundcovers, these blooming succulents flourish in full sun in well draining soils with little water, once they are established. Plus, they’re amazingly colorful!

About Delosperma

Native to Africa, with fleshy, clustered green leaves, Delosperma species and varieties solve many common groundcover, erosion and container garden needs. From only ½” tall and a few inches wide to 4 inches tall and spreading to 2 feet wide, Delospermas begin blooming with daisy-like flowers in early spring and often continue blooming through the summer. Depending on the variety, these perennial succulents punch up the garden with bright fuchsia, red, bronze, yellow, white, lavender or orange flowers, and several variegated or two-toned blooms are available as well.

A more adventurous gardener can turn up the heat with Delosperma ‘Fire Spinner.’ It quickly grows to an attractive weed-thwarting 2 inches high and 15 inches wide mat in two seasons. The variety name perfectly describes the flowers. It’s a kaleidoscope of hot colors on unbelievable 1½” wide fiery flowers. Radiating from a clear white center, petals with deep magenta color in the middle transition to hot orange, finishing with bronze on the outer tips. These arresting flowers sit atop shiny, apple-green needle-like succulent leaves making an astonishing garden statement from late spring through fall. What an unexpected showstopper!

What Delosperma Demands

Most gardeners are all too used to the finicky habits of their favorite plants, from precise soil pH levels to a specified amount of sunlight to a unique cocktail of soil fertilization and amendments for the best growth. Not so with Delosperma – all these plants ask (it’s more of a demand, really) is good drainage. With that, they’re fairly self sufficient – easy to care for and requiring very little maintenance.

Birds, bees and butterflies love Delosperma just as much as gardeners, but deer don’t, making these plants ideal for areas where deer are a bit too friendly in the garden. They work well as borders or to soften the edges of buildings, walkways and driveways, and they’re right at home in well-drained terraces, rock gardens and xeriscaping.

Whether you live in a naturally drought-prone area or just want to conserve water without sacrificing color and beauty, give Delosperma a try and you won’t be disappointed!

delosperma-1

Growing and Containing Rampant Spreaders

What do you do when you fall in love with a plant but you know it spreads and could take over your entire garden? You don’t have to give up your hopes of nurturing this plant, you just have to learn how to contain it securely without destroying its beauty.

Favorite Spreaders

Many different plants may be desirable, but have the nasty hidden personality of spreading out of control. Common spreaders that are still garden favorites include…

  • Mint
  • Lamb’s ears
  • Lily-of-the-Valley
  • Beebalm
  • Loosestrifes

Any plant that is labeled as “fast growing” or “aggressive” can potentially take over a garden space and should be treated with caution if you want to keep it contained.

Literal Containing

Containing a known spreader could be as easy as planting it in its own container. Ceramic, metal or resin pots certainly put a punch of color in a corner, on a deck or by the front entrance. They’re also great for adding plant height and focal points in the garden, and they will ensure the plant stays put.

Perhaps a touch of whimsy would add pizzazz to your garden while controlling your marauder. Picture your potential runaway planted in a pot, “sitting” in a hole cut in the seat of a painted and weather-sealed wooden chair. This creates a colorful garden focal point, elevates your beauty and keeps it from spreading. Another quirky option is to use an old, rusty wheelbarrow as the container and position it near the garden or inside a flowerbed. It can be fun to get creative with container options, all of which will help you enjoy your favorite spreading plant without letting it get out of control.

Containing Plants in the Garden

If you want the potential invader in the ground, research the plant well before introducing it to your garden. Different plants require different control measures. Mowing to eliminate new growth controls some plants. Herbicide applications can have an effect on others, while some require hardscaping to control their roots and keep them in place. Some plants may not give in easily to any control methods.

For the Most Vigorous Runners

In cases where plants are nearly assured to take over without proper control methods, trench containment may be the best option.

  • Determine where you would like to plant, bearing in mind the needs of the plant for proper sunlight, moisture and soil condition.
  • Dig a trench 26-30 inches deep along the boundary of the planting area that you wish to contain.
  • Line this trench with a high-density polyethylene liner, leaving 2 inches of the liner above the soil line.
  • Overlap the end of the liner by at least 6-8 inches to that the plant root cannot escape through the opening.
  • Backfill the trench to secure the liner and hold it firmly in place. If desired, you may fill the trench with gravel or other inorganic material to create another level of containment protection.
  • Plant inside the growing area, taking care not to disturb the containment trench.
  • Periodically, check the edges of the trench liner to be sure the roots don’t try to climb over the barrier. If they are, be ruthless and cut them back.

Left to their own devices, vigorously spreading plants can quickly become a nightmare as they take over a garden or landscape. If you know how to contain these plants, however, your dreams of nurturing them in your yard can come true.

rampant-2rampant-1

Woolly Adelgid

Woolly Adelgid is an aphid-like insect that is a serious pest of the Eastern Hemlock, Tsuga canadensis, and its cultivars. Adelgids need to be controlled as this insect spreads easily and rapidly and, if left untreated, can kill a mature hemlock in 4-10 years.

Recognizing Adelgids

Adelgids, formally called Hemlock Woolly Adelgids (Adelges tsugae) or HWA, present as a fuzzy, cottony white substance on the underside of hemlock needles. This is actually a waxy filament produced by the tiny, 1/16-inch insect as a covering and protection for itself and its eggs. These insects are native to Asia, and damage trees by sucking on the sap. As damage occurs, the needles of the tree become grayish rather than robustly dark green. When infected, trees may lose their needles and will not produce new growth on the damaged branches. Because infected trees are significantly weakened, they are subject to many other infections from diseases and pests, and ultimately die.

Controlling Adelgids

Exercising good horticultural practices is the best way to prevent Hemlock Woolly Adelgid infestations. Site your hemlock appropriately, in proper sunlight and a location where it can grow well without being cramped or crowded. Water and feed as required for optimum health, including adding extra fertilization or nutrition as required. A healthy tree will always withstand disease and insect problems better that one that is already stressed.

When Adelgids are present, apply insecticidal soap or horticultural oil in early April and again in June. Be certain to follow manufacturer instructions carefully and reach the underside of the needles where the Adelgids are located. When spraying in June, do so on a cooler, overcast day so as not to burn the Hemlock needles. If your Hemlock is too large to handle on your own, contact a trusted and licensed tree-care professional for treatment. Even after you have controlled an outbreak, annual spraying is recommended to be sure the pests do not reappear.

Other types of chemical treatments that can be used against these invasive pests include…

  • Foliage Sprays: These insecticides are sprayed over the entire tree to coat the foliage. They are stronger than soaps or oils and may be effective for 2-4 years. Higher toxicity can lead to other problems and contamination concerns, however, and applications should only be done by experienced professionals.
  • Soil Drenches: These are insecticides that are specially formulated to be absorbed by the tree’s roots and then will be consumed by the Adelgids as they sip on the tree’s sap. This can take longer to be effective, however, but it has long-lasting impact to control these insects. They should not be used where water sources may be inadvertently contaminated.

In some areas, predator beetles have been released to consume Adelgids, and while this is not yet effective on a widespread scale, there have been positive reports and limited success.

Hemlock Woolly Adelgids are a vicious, invasive pest, but with proper control techniques, their invasion can be stopped and the majestic hemlock forests renewed and restored.

file000412127175

Vegetable Garden Weed Control

You may want to grow many different things in your vegetable garden, but weeds probably aren’t on your favorite edibles list. Weeding can be an enormous time-drain and is one of the the least liked gardening chores. What’s wonderful is that we have so many weed control methods to choose from; there’s a solution for every type of gardener and their schedule.

Safe Control Methods in Edible Gardens

When it comes to vegetable gardening, many gardeners are very particular about what goes into their soil and onto their plants, as it will eventually end up on their plates and in their bodies. Here are some indisputable safe and effective ways to control weeds, without chemicals, in your veggie or any other garden for that matter.

  • Apply corn gluten meal to prevent weed seeds from germinating (don’t use if direct seeding your garden as all seeds will be affected).
  • Plan your garden to crowd edible plants together, effectively crowding out weeds because there isn’t space left for them to grow.
  • Manually pull weeds when the soil is wet and roots are looser. This can be done after a natural rainfall or after supplemental watering.
  • Hoe when the soil is dry to break apart weeds and damage their roots. Pick up larger weeds after hoeing so they cannot reestablish themselves.
  • Mulch with salt hay which contains no weed seeds. The hay will shield weed seeds from the sunlight and moisture they need for germinating.
  • Lay biodegradable and compostable mulch film down to create a firm barrier to keep weeds out or to prevent existing weed seeds from germinating.
  • Attract seed-loving birds such as finches and sparrows, which will happily eat hundreds of weed seeds each day for natural control.
  • Consider raised beds or container gardening to more effectively control weeds and make any remaining weeding easier.
  • Use fire (with all appropriate safety precautions) to burn out unwanted weeds, especially in pathway areas or along garden borders.
  • Treat exposed weeds with boiling water – the hotter the better – to cook and kill them. Several treatments may be needed for the best effects.

Weeds can be some of our worst enemies in the garden, and it is impossible to eliminate every single weed all the time. By using multiple methods and keeping on top of the task, however, it is possible to minimize weeds and make this chore less onerous, without resorting to harsh chemicals.

VeggieWeedControl

Viburnums

Viburnums are one of the most outstanding groups of shrubs for use in landscape planting. Varying in height from 2-30 feet, viburnums can be found to suit most any planting location. Their varied growth habits, excellent foliage, striking and fragrant flowers, showy fruit and interesting winter appearance make them an excellent choice for most gardeners.

Which Viburnum to Choose

Effective in many situations, the smaller shrub forms, such as Viburnum carlesi ‘Compacta’ and V. opulus ‘Compactum’, are excellent for planting close to houses or in tighter spaces, such as narrow flowerbeds or in side yards. The larger forms, such as V. lantana and V. prunifolium, make good specimen and screen plantings to be a centerpiece in the garden or provide privacy. Which one will work best in your landscape will also depend on the available space you have, your soil type and the sunlight needs of individual plants.

Flowers and Foliage

Viburnum flowers, primarily white in color, are borne in clusters, ranging from a rounded snowball shape to a flat form. Large, white snowball clusters of florets are found on V. carlcephalum and V. macrocephalum. Half-round flower forms are borne on such types as V. carlesi and V. burkwoodi. Most of the others have a flat cluster of florets such as V. plicatum ‘Tomentosum,’ V. dilatatum and others.

Viburnum foliage can be extraordinary with types that include a velvety smooth leaf surface, bold rough-veined textures and glossy leathery character, all of which add more textural interest to the landscape. In addition, some forms have attractive fall leaf color such as the purplish red of V. dentatum and V. dilatatum, as well as the brilliant red of V. opulus.

Brilliant Berries

In the fall and winter there is also ornamental value with berries. Many viburnums produce lovely fruits in shades of red, pink, yellow and blue-black which not only add to fall and winter interest, but can also be attractive to birds and other backyard wildlife.

Viburnum Care

With so many many pleasing aesthetic features of these plants, how easy are they to care for? Easier than you may think! Viburnums are very hardy, resistant to serious pests, thrive in a variety of soil and environmental conditions and require little pruning. They will grow in either sun or shade; however, flowering and fruiting will be more profuse in a sunny location.

With so much to choose from and so many advantages to these shrubs, there’s sure to be one to suit all your landscaping needs. Stop in to consult with our landscaping experts today, and we can help you choose the perfect viburnum to complement your landscape.

viburnum_2

viburnum_1